![[MiniDSP module]](../jpg/minidsp-module2.jpg)
![[MiniDSP module]](../jpg/minidsp-module2.jpg)
Product name: MiniDSP digital sound processing module.
Manufacturer: MiniDSP
Cost: 99 USD.
Reviewer: Nick Whetstone - TNT UK
Reviewed: May, 2011
The great thing about technology is that it keeps moving forward. The downside of that is trying to keep up with it, more so for the amateur, or DIYer, who is not employed or trained to do so. Hi-fi has always embraced the latest technologies but when sound processing switched from simple analogue filters to digital sound processing, it meant that many Hi-Fi DIYers were left behind. Even if they could understand the technology involved, they almost certainly didn't have access to the necessary hardware, or the skills to program that hardware. That was until MiniDSP came along and offered a solution to both of those problems.
MiniDSP's idea was to offer modules that could be configured to do different jobs by connecting them to a PC/laptop and programming them with different software that could be downloaded from the MiniDSP web site. So nothing complicated to build, and no spending the next six months learning how to program. Instead you can buy a completed module in a case, add a power supply, connect it to your computer via a USB lead, download the appropriate software and install that in the module, connect the module into your hi-fi, and play some music.
So what can you actually do with digital sound processing (DSP)? Well the short answer is anything that you can do with analogue processing, and a whole lot more. There are two immediately obvious applications for DSP in hi-fi. The first is to create active loudspeaker crossovers that will replace the analogue crossovers. An active crossover is one that is powered, and placed before the amplification stage. There are distinct advantages to active crossovers but that subject has been well covered in the past so just take my word for it. If you want to read more about active loudspeaker crossovers, this article by Rod Elliot at ESP is a great place to start.
Another way that we can use DSP in hi-fi is to add some sound shaping, rather like a much more sophisticated graphic equalizer. For instance, it should be possible to create a unit to replace something like a Behringer DEQ2496 although the MiniDSP module won't be able to measure and automatically correct as the DEQ2496 does. Instead you will need to measure using a sound level meter, and then program the MiniDSP module from your computer. I hope to write another article looking at the MiniDSP concept used instead of the DEQ2496. The MiniDSP modules have many other uses too. Once you have one, you simply purchase the relevant software plug-in for the function that you require. If you ant to use the module for another function, you simply download another plug-in.
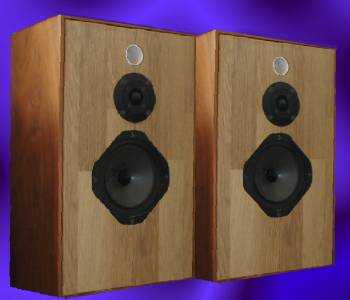
Despite the fact that MiniDSP has brought DSP to the domestic hi-fi customer, the whole subject is still a bit mysterious, so I wrote to them suggesting a review in which I will endeavour to demystify the whole process of buying the modules, configuring them, and getting them to work in an actual hi-fi system. The first project will involve making a 2-way active crossover, and the test-bed for this project will be a pair of two-way speakers that I have previously had working well with a simple analogue active crossover. These speakers use Audax drivers and were originally bought as an IPL A2 kit. You can read more about the original project of converting them to active here.
Actually, I needed to rebuild the drivers into new cabinets as I had thrown out the old ones during a massive clear-out last year. To save myself some work, I purchased an old pair of MS Pageant II speakers with faulty drivers (Ebay of course), and modified the cabinets to accept the Audax drivers. The MS cabinets were by a lucky coincidence exactly the correct volume for the Audax HMZ170's when used with active crossovers. However on testing the new speakers I found that one of the tweeters wasn't working and wondered if and where I could get hold of a replacement, as Audax had stopped supplying the DIY market some years ago. Fortunately, an email to Falcon Acoustics produced two bits of very good news. First off it seems that Audax have recently reversed their decision not to supply the DIY market, and secondly, Falcon, who are an Audax stockist, were prepared to kindly replace the damaged tweeter in order for me to complete this review. This was great news and I am much indebted to Jerry Bloomfield at Falcon for his kind assistance in keeping this review on track.
Just after the speakers were built up, the modules arrived from MiniDSP. They come ready built with all of the connectors attached so it is simply a matter of building them into a suitable enclosure, adding a 4.5-24v DC power supply, and they are ready to play with. MiniDSP also provided plenty of cables to connect the modules to the computer and the hi-fi. The next stage was to create a user account on the MiniDSP web site that would enable me to download the necessary software to enable me to create my active crossover. This part of the exercise was reasonably straight forward. After logging in, the software is downloaded, unzipped, and then run. You will need an Adobe plug-in too but this was automatically installed on my computer when I ran the downloaded software. There are two versions of the software for both Windows and MAC operating systems. Make sure that you also download the PDF manual for the software module. After everything is installed, the program runs and you get a screen that at first can appear rather intimidating if you know nothing about crossover design etc.
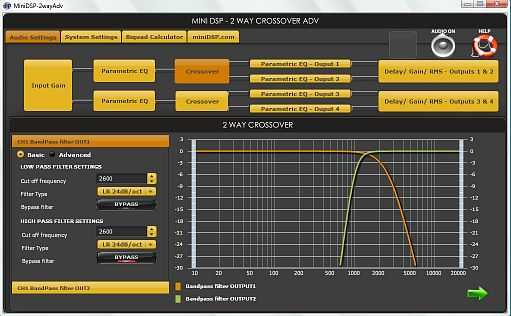
It will obviously pay any user of this software to study at least the basics of crossover design, but even a beginner should be able to create a basic working crossover. The analogue crossover that I was trying to replicate was a very simple design using 12 db (second-order) Butterworth filters with a crossover point of 2K6 Hz. These specifications can be simply entered into the relevant boxes in the design program. The picture below shows the page in the design software that allows you to set the crossover point. One tip worth remembering is to enter the specifications for both channels, as they are on different pages.
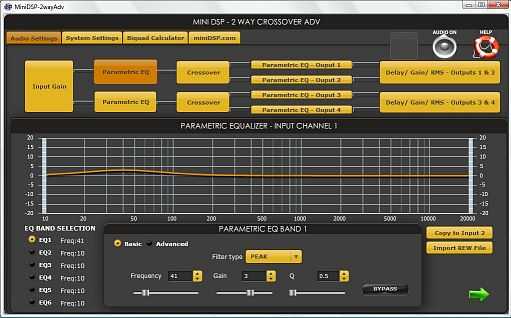
With the filters specified, the crossovers can be used but the MiniDSP system takes things so much further. You can change the crossover point and type of crossover in a few minutes (even on the fly while the music is playing). You can add some equalizer settings. For instance you can boost the bass a bit as I did with the A2's.
Or if you find for example that the speakers have a peak around 40 hz (caused by room modes) you can EQ it out by putting a corresponding dip in the EQ settings. Or perhaps there is a bit too much top end and you can roll off the highest frequencies. You can also tailor the sound using other parametric EQ adjustments, in effect providing you with a 6-band graphic equaliser.
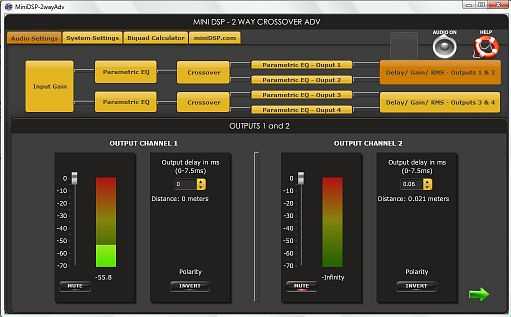
It is also possible to time-align the drivers (where their centres are physically out of line due the their different sizes). It can be necessary/advantageous to align drivers of a difficult physical size, eg woofer and tweeter, so that the sound from each driver arrives at your ears at exactly the same moment.
And all this is achieved without going near a soldering iron as would be required to rebuild, or adjust a physical crossover. There is no need to go out and buy different value capacitors, resistors or inductors. In other words, you can play around as much as you want. Try the new crossover design by flashing it to the MiniDSP module, listen to it, measure it, and then try changing something in the design and flashing that to the module. Even if you know little about crossover design, you should be able to achieve good results by trial and error. If nothing else, you can hear what a Butterworth crossover sounds like compared to say a Bessel or Linkwitz type. Theory is great, and you can read plenty about the different characteristics of the different crossover filter designs, but there is no substitute for hearing those differences with your own ears! The MiniDSP will teach you quite a lot, as well as doing the job that you set it up for.
It's all much easier to understand in this video showing how the plug-in is used (there's no sound). Don't be put off by some of the more advanced features, you really can get an acceptable crossover by setting only the type and frequency of the filter type. All the other adjustments can come later when you get familiar with the whole concept.
Summarising, once you have the software downloaded and installed, you go to the 'audio settings' tab' and select all of the crossover specifications that you want. Then go to the 'system settings' tab and click on SAVE, to save the configuration to your hard drive. Go back to 'audio settings' and with the MiniDSP module attached to the computer via the USB lead, and with the 24 VDC power supply connected, click on the green circular logo that says 'synchronize' when you hover the cursor over it. Click this button, and the crossover specifications are copied to the module, and saved in its 'memory'.
Next connect up the module between your source, and amplifiers. You will of course need two stereo amps, or four monos. I was a bit puzzled as to what connected to where so I only connected up the woofers of each speaker to begin with. As it happened when I played some music, I had connected them up the wrong way round (so the high-pass output played through them instead of the low-pass) but it was simple enough to swap cables over until it was correct. I then hooked up the tweeters of each speaker, and playing safe (because with the passive crossovers removed the tweeters are connected directly to the output of the amplifier), I included a 10uF capacitor in series with each one. The outputs are not marked as to what they are because it depends on the use of the module as to which output does what. For instance, you may use two of the modules to create a 4-way active crossover, in which case the all the outputs on one module would be for the same channel, hence they can't be labeled during manufacture.
Then it was on with some music, and sitting back to listen. I had forgotten how good these speakers sounded. I more or less stopped using them actively when I moved to open baffle speakers nearly a decade ago. They sounded exactly as I remembered them with the crossover as it was set but I decided to play with the time delay settings to see if I could improve things. Using the album 'Amused to Death' by Roger Walters, I carefully listened to different Q-sound effects as I adjust the time delay on each tweeter. I felt that things improved from zero time delay to around 6mS (for the tweeters), and then started to go a little out of focus as I increased the setting. And of course, I couldn't help but play around with different types of crossover too. In fact, a whole morning disappeared very quickly, but it was a lot of fun.
Once you have the crossover working satisfactorily, you can simply disconnect the MiniDSP module from your computer, and it will function perfectly. If you then decide that you want to alter it, you reconnect the computer, program in the changes, synchronise the module with the computer, and disconnect the two again.
When I think back to my early days in DIY hi-fi, and my decision to 'go active', it was a mind-boggling task to decide what type of active crossover to choose. Of course most people like me bought one and hoped that it would be ideal. They were too damn expensive to swap around for most of us, and even if you built one, as I did eventually, the cost in time and money of rebuilding it in a different configuration meant that it never got done. The MiniDSP module and software has changed all that. Now we can tailor a crossover to suit our speakers, our rooms, and our ears, and do it easily. Sure, you need to have some idea of how crossovers work, but it is so easy to experiment with the MiniDSP that you can also arrive at a solution empirically. I could easily hear that I preferred a Butterworth or Bessel filter with the A2's instead of a Linkwitz-Reilly type. A lot will depend on which speakers you use. I knew that mine used drivers that were well matched (by Ivan Lesley of IPL) and worked well with an active crossover. But even if you start with drivers that you know little about, there is a wealth of knowledge on the various hi-fi forums to help you get started. I notice that the MiniDSP concept is also being discussed increasingly on those same forums.
Talking of forums, MiniDSP have their own forum, and that is obviously the best place to start asking for help about their products. One or two aspects can be a bit confusing at first - it took me a while to notice the 'synchronize' button (to the left of the AUDIO ON button) for instance, so it is useful having fellow users on the forum to help you out when you get stuck. In short, although it may look complex initially, the MiniDSP concept is actually fairly straight-forward once you have one to play with.
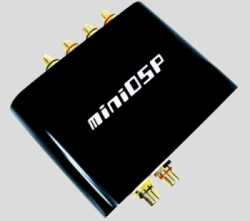
You can purchase the MiniDSP module as a completed PCB with connectors (as was used for this review) or in a case as shown to the right.
Either way, it's a great piece of kit! Even after you have added a suitable power supply, the cost is highly competitive compared to ready-built active crossovers that probably won't do half as much as the MiniDSP can. And if you no longer require it as an active crossover, it can be reconfigured to do other work in your hi-fi system. So don't be put off by the term 'digital sound processing' because all the difficult technical problems have been taken care of, and the software allows you to fairly easily take control of the hardware. Almost anybody should be able to use the MiniDSP and get good results with a little fiddling around. It's all great fun, educating, and very effective. Yes, I'm a new fan of MiniDSP!
Finally, if you still need convincing of how simple it is to use MiniDSP, here is a summary of how to use it.
© Copyright 2011 Nick Whetstone - nick@tnt-audio.com - www.tnt-audio.com