Article: Modifications to the DiyParadise 'Monica2' DAC).
Cost: (of parts) approximately 20 UK pounds maximum.
Review: Nick Whetstone.
Reviewed: April 2008.
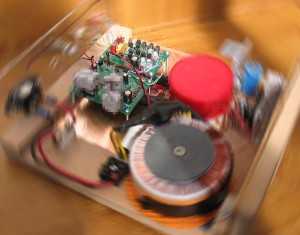
I reviewed the DiyParadise Monica2 NOS DAC way back in October 2005 and was suitably impressed. However, for me it didn't have quite a strong enough presentation for it to replace my modified Scott Nixon DacKit. But fitting the Rudolf Broertjes' I/V output stage (described here transformed Monica2 into something quite special. In fact good enough for me to get out the soldering iron and tackle the modifications described here. I guess whether you will want to attempt the upgrade will depend on your DIY skills but I can tell you if you can solder proficiently, there isn't any real difficulty in completing the modifications described below. Please note, this article refers to modifying the basic Monica2, and not the USB version!
The parts required to carry out this upgrade are:
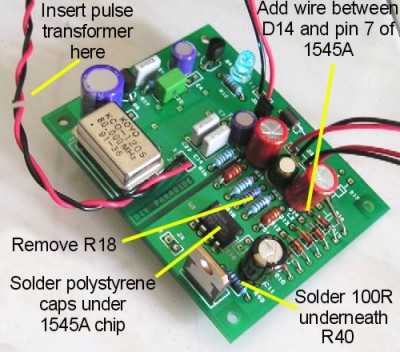
Start by removing the Monica2 PCB. Remove the resistor marked as R18. Be careful here. I suggest snipping out the resistor is the easiest option. If you want to remove the leadout wires, then use some de-soldering braid. When R18 has been removed, solder a short length of the (insulated) solid core wire between the lower pad that R18 was connected to, and the left side junction of D13/D14 as you look at the PCB from the top.
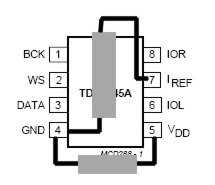
Now take the two polystyrene caps and solder them to the pins of the 1545A DAC chip on the underside of the PCB. This requires some care and patience but is not too difficult if you take your time. The diagram above shows how I connected the two capacitors to the DAC chip pins. I suggest sleeving part of the leadouts of the capacitors to prevent unwanted short circuits!
Next, take the 100R MF resistor and solder it in parallel with resistor R40 next to the DAC chip. I did mine on the underside of the PCB. Of course, you could remove R40 if you prefer, and solder an 18 ohm resistor in its place.
And that's it - almost! Re-install the Monica2 PCB but instead of soldering the SPDIF input wires to the socket, fit the pulse transformer between the input socket and the SPDIF input of the DAC. Using the Murata transformer, connect the input socket to terminals 1 and 2, and then the wires coming from the Monica PCB to terminals 5 and 6. Don't worry too much about polarity here as it doesn't matter with an SPDIF connection like this.
If you have been lucky enough to get hold of another pair of the BG capacitors, I suggest removing the originals, soldering the leg of one to one leg of the new BG. If the existing free leg of the original BG is long enough, solder it back to the pad it was in. If not use a short length of wire. Then connect the free leg of the new BG to the relevant (left or right) output socket.
There, it isn't really too difficult, or a great deal of work. And the rewards far outweigh the cost and time involved, taking Monica2 to another level. In fact, I am quite surprised, how good this DAC is with the output stage and modifications. Thanks is due to Paul Needs, Rudolf Broertjes, and Ole Schüsseler (if I have missed anybody here, I apologise) for their work in improving the Monica2 DAC to this level of performance. If you want more help with the upgrade, a good place to seek help is the DIY forum at DiyParadise.If you didn't get hold of a Monica2 before DiyParadise stopped selling them, don't despair. I am told by Paul Needs that even the fully modified Monica2 still falls short of the new Monica3 that has a much improved circuit. Perhaps we will get the chance to review Monica3 at a later date. For now, I can thoroughly recommend any of you with a Monica2 to do these modifications.
© Copyright 2008 Nick Whetstone - www.tnt-audio.com