[ Home | Staff & Contacts | DIY & Tweaks | Listening tests | HiFi Playground | Music & Books ]
Tweaking the...
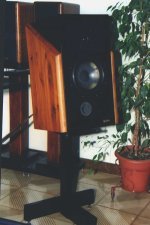 Spendor SP 2/2
[Italian version]
Why the Spendor SP2/2?
Several years ago, when I decided to buy a new pair of loudspeakers, I started a long session of comparative listening tests for bookshelf loudspeakers. Despite the large number of contenders the Spendor SP2/2 scored high on my preference list because of:
- Cool looks, sano and traditional, these 'speakers seemed to be built to last
- Their size: not a minimonitor but definitely not a large cumbersome bookshelf.
- Good finish and craftsmanship
- Their sound (of course!): not real deep bass but still solid and entertaining. A bit on the dry side.
- Their good dynamic ability.
- Good 3D capabilities
If memory serves me well I've preferred the Spendor SP2/2 insetad of the first series of Sonus Faber Electa...go figure :-)
The sad part
Well, after 10 long years of listening tests some drawbacks and compromises become pretty evident:
- The 3D image is not so precise, stable and well focused. The width of the soundstage appears a bit compressed.
- There's a slight tendency to a boxy sound
- The mid-bass is a little too warm and wooly
- The mid-high frequencies appear to be - sometimes - on the harsh side
- Not enough bass and upper-highs.
I dunno what has happened, maybe my tastes have changed a bit during the years, maybe the Spendor passive components are a bit "old"...anyway, time was come for a complete tweaking session. First of all I've done the best I could to improve the quality of the cabinet (and its appearance, too).
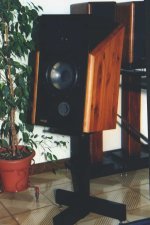
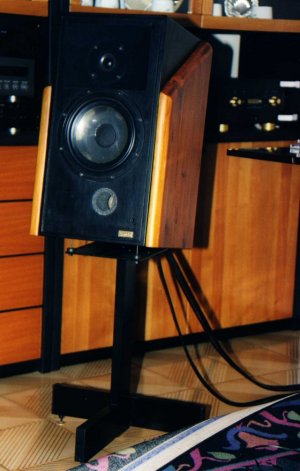
As you may argue from the pictures, some changes have been made to the exterior finish of the Spendor SP2/2.
Actually the cabinet has been stiffened by means of wood side panels.
And here's how I did it:
The cabinet
I've tried to mimick the Sonus Faber Extrema kind of cabinet by applying two natural wood side panels. OK, not walnut wood, just cheaper pinetree panels, 3 cm thick. Here are the data you may need:
- width: cm. 28
- max height cm. 50
- min height cm. 35
As you may see, the edges of the panel are "round", just an extra touch of Sonus Faber-esque looks.
Now everything is ready for a complete painting: black the original cabinet (except the side panels) and red mahogany for the wood side panels which have been glued to the sides of the 'speakers by means of the ubiquitous Vinavil (vinylic) wood glue.
The warm mid-bass colouration disappeared but the 'speakers sounded worse than before because - this way - all the drawbacks were even more evident :-(
So I decided to go for a more serious tweaking session. So I asked our resident DIY loudspeakers guru :-), Giuliano Nicoletti, to lend a hand and do something to improve the old, beloved Spendor SP2/2. I'll let him to explain you everything.
Genesi of the Spendor SP2/2 "GN Signature"
As soon as I listened Stefano's Spendor SP2/2 one thing was clear to me: there was no real bass and the mid-bass range was so dry that the overall sound was soooo unpleasant.
The mid range was slightly above of the rest and the 3D image was just there, glued at the center between the 'speakers. No real soundstage at all, period.
So I took everything apart and measured the electrical parameters of the drivers by means of my faithful Clio audio board. The tweeters were OK so I could go on.
The woofers and, in particular, their rubber suspension was suffering from the weight of the years. While a foam suspension tends to disintegrate (ashes to ashes :-) ), a rubber one just gets stiffer over the years. So the resonance frequency goes up as well as the Qt and the driver quits from being able to reproduce real bass frequencies.
Anyway, since changing the suspension was quite expensive, I decided to modify the crossover in order to get the best out of these drivers.
The Spendor SP2/2 crossover network uses some ideas which were quite popular during the Eighties and today it shows some fault: a third order filter for both the drivers, no damping resistors and a first order filter (in series with the tweeter) to cut the frequency response in the upper highs and modify the phase response. Gosh.
I'm personally against this kind of "manipulations" of the sound because they - very often - add some colouration and time delay which sound unpleasant to my ears. So I decide to start from scratch.
Playing with a brand new crossover!!!
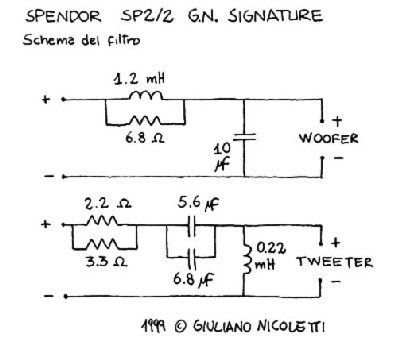
As you may argue from the scheme, now the woofer makes use of a 2nd order network with a resistor (in parallel with the coil) which makes the frequency response in the mids more linear. The acoustic slope is 12 db/octave at 2500 Hz.
The tweeter also makes use of a second order network, especially designed to smooth the slope at the cross frequency (2500 Hz) and to improve the linearity of the off-axis response. The acoustic slope is around 12 db/oct as well.
The tweeter, originally connected with the inverted phase, now should be connected in the standard way and the 'speakers should be placed sligthly bent (few degrees towards the rear wall, that is). The value of the resistor can be personally changed to fit everyone's tastes (more highs, less highs, no highs :-)).
The original crossover has been completely removed so it could be installed again to get back to the original operating conditions. And now something from Stefano again for the listening test. If you ever decide to build this new crossover, please contact me if in doubt. E-Mail me at Giuliano Nicoletti.
Listening test
After the crossover had been modified as above, I decided to do some extra tweaking to this pair of Spendor's. Namely:
- Internal rewiring with standard OFC cable braided as our TNT TTS mains cable. This mod added more control to the bass and a slight bonus on the highs in the transparency department.
- A self-adhesive felt circle around the tweeter and above the upper part of the baffle has been added in order to minimize diffraction.
- A cork washer between the tweeter and the cabinet and some blue-tac between the woofer and its housing have been added to improve the mechanic coupling of the drivers with the cabinet.
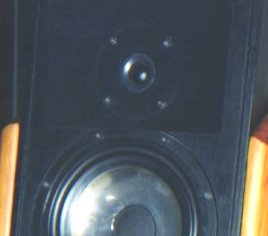
This is how the sonic performance of the 'speakers has changed:
- Forget the deep bass below, say, 60 Hz. It just wasn't there before the "cure" and still it isn't there. In my opinion the performance of the bass range hasn't changed much so I suggest, when using the Spendor's into large listening rooms (like mine), to start thinking of adding a subwoofer (aaaargh!) in order to get some real deep bass.
- The mid bass is now far more linear as it was gummy and unnatural before the "cure".
And so is the mid range, which seems to have lost the excessive "presence" effect of the early days. The "monitor-like" approach seems gone too. Everything appears to be more linear and coherent now.
- The HUGE improvement can be found in the high range which is now gorgeously transparent and accurate, so precise that a proper amplifier matching should be carefully evaluated. These modified Spendor's can reveal any tiny detail and fault of their partners (cables, amps etc.). Avoid dry cables like the plague.
When played at high listening levels the Spendor's offer a good dynamic sound and the soundstage is now wider and better focused, richer in detail and air.
In order to get a very wide soundstage you may need to place them like the Leaning Tower in Pisa :-). Few degrees will get the job done. Of course, your mileage may vary.
The rather boxy sound is now gone and the cabinets virtually disappear. The best results have been achieved using a 50 cm tall stand with spikes versus the floor and the 'speakers.
There's a price to pay for this: now some bad recording sounds really BAD and if the modified Spendor is a pleasure for my ears with well recorded albums it becomes a chinese torture with bad records. That's life...a give and take game, as usual.
The fine print
The REAL price to pay in dollars for these mods is approximately 30$ for the cabinet, 5-10 dollars for the re-wiring (depending on which cable you use) and then a variable amount for the caps, resistors etc. This is the price you pay if YOU do the job, it could be far more expensive having someone doing the job for you. But please remember this is a real hardcore DIY magazine :-)
The bottom line is: now these Spendor's shine with a new life now and I can always get back to the old configuration, since the previous crossover hasn't been modified. You can rest assured I won't go back to it!
A warm thank you to Giuliano Nicoletti for the new crossover and the time he has spent on this project, adding some precious advice and hint.
© Copyright 1999 Stefano
Monteferri & Giuliano
Nicoletti - http://www.tnt-audio.com
How to print
this article
[ Home | Staff & Contacts | DIY & Tweaks | Listening tests | HiFi Playground | Music & Books ]
 Spendor SP 2/2


